Coming Soon
Home > Forum


Author Topic: My next project  (Read 30694 times)

0 Members and 1 Guest are viewing this topic.

Offline cnrcpla

  • Novice
  • *
  • Posts: 0
    • View Profile
My next project
« on: April 08, 2013, 12:11:01 AM »
And boy is this one a project  :-X I'll be picking up a '95 RM250 this weekend. It has a seized motor, ripped radiator, FUBAR'd plastics, and is need of a paint job. I can TIG the radiator, no big deal there, I can give the plastics some life back, no big deal, but the motor... I will be opening it up first thing to see what's wrong. I'm hoping best case scenario its a fried piston and the bore isn't to bad. If it turns out to be the worst case scenario (fried bottom and top) I'll be looking at a used motor. What are my options? I'm thinking another rm250 motor, but at the same time I can't help but wonder what other motors would fit in there with minimum fuss. I can weld mounts, but hopefully wont have to. I'll put up some pics as soon as I get it here.
« Last Edit: December 31, 1969, 04:00:00 PM by ' »

Offline SachsGS

  • Professional
  • *****
  • Posts: 1235
    • View Profile
My next project
« Reply #1 on: April 08, 2013, 04:11:25 AM »
Those case reed RM250 motors were tough! I'd overhaul the existing motor.
« Last Edit: December 31, 1969, 04:00:00 PM by ' »

Offline TMKIWI

  • Professional
  • *****
  • Posts: 1634
    • View Profile
My next project
« Reply #2 on: April 08, 2013, 07:07:39 AM »
Those case reed RM250 motors were tough! I'd overhaul the existing motor.

X2.
Easier then trying to make another motor fit.
« Last Edit: December 31, 1969, 04:00:00 PM by ' »
If you don't fall off you are not going hard enough

Offline TotalNZ

  • Expert
  • ****
  • Posts: 247
    • View Profile
My next project
« Reply #3 on: April 08, 2013, 07:13:25 AM »
Yeah rebuild her, it would be rare for a motor to be that trashed that it's not worth fixing.
I don't think they were electro plated bores either were they? that'll give you an option to oversize if you need too.
« Last Edit: December 31, 1969, 04:00:00 PM by ' »

Offline cnrcpla

  • Novice
  • *
  • Posts: 0
    • View Profile
My next project
« Reply #4 on: April 11, 2013, 12:25:13 AM »
If it is not electro plated than I will def hone it with a new piston. Anyways, I just got it home. This thing is ROUGH  :-X


Duct tape and elec tape graphics!!! That must have added at least 10 HP easy  ;D I'm gunna be TIGing the sub frame, and then painting it. I hope to open up the engine tonight and see what I'm up against. More pics to come from inside this beast.
« Last Edit: December 31, 1969, 04:00:00 PM by ' »

Offline _X_

  • Professional
  • *****
  • Posts: 272
  • M.I.R.A.
    • View Profile
My next project
« Reply #5 on: April 11, 2013, 01:20:03 AM »
easily ads 10 hp! i'd keep those.
« Last Edit: December 31, 1969, 04:00:00 PM by ' »

Offline cnrcpla

  • Novice
  • *
  • Posts: 0
    • View Profile
My next project
« Reply #6 on: April 11, 2013, 01:43:35 AM »
I wont lie, they look good for the tape they were made with
« Last Edit: December 31, 1969, 04:00:00 PM by ' »

Offline cnrcpla

  • Novice
  • *
  • Posts: 0
    • View Profile
My next project
« Reply #7 on: April 11, 2013, 03:18:20 AM »
Ok, calling the engine guru's (TMKIWI I believe you were labeled the RM guru). I need help getting the seized piston out of the bore. I got the cylinder loose but the piston refuses to budge. The bore is fine judging by what I can see  :o This may have been a SWEET pick up. I couldn't get any decent shots with a cam, but the bore is perfectly smooth  :o

« Last Edit: December 31, 1969, 04:00:00 PM by ' »

Offline TMKIWI

  • Professional
  • *****
  • Posts: 1634
    • View Profile
My next project
« Reply #8 on: April 11, 2013, 08:46:21 AM »
The bore may look smooth ( what you can see ) but could be worse where the piston sits.
Are you intending to rebuild the bottom end ?.
Is the piston stuck solid.?
If so you can drill a ring around the piston about 15mm in from the outer edge.
Drill a series of 10mm holes 1mm apart and once all holes are drilled use the drill bit to "connect" the holes.
(Move the drill side to side).
Give the center of the piston a decent hit with a hammer and the piston should seperate.
Remove the cylinder and then you can press out the remainder of the piston with a hydraulic press.
( Make a die the correct size to press on the left over piston ).
Rebuild.
« Last Edit: December 31, 1969, 04:00:00 PM by ' »
If you don't fall off you are not going hard enough

Offline 2T Institute

  • Expert
  • ****
  • Posts: 225
    • View Profile
My next project
« Reply #9 on: April 11, 2013, 09:20:04 AM »
Just fill the cylinder with diesel overnight(plug the exhaust with a potato) come back in the morning and try to mover with kick start after removing the diesel
« Last Edit: December 31, 1969, 04:00:00 PM by ' »

Offline cnrcpla

  • Novice
  • *
  • Posts: 0
    • View Profile
My next project
« Reply #10 on: April 11, 2013, 05:14:04 PM »
GOT IT! Soaked it in WD40 overnight and tapped it a little with a hammer and socket extension. Came down to BDC and I was able to pull the cylinder off. 

I'm hoping the bottom end is in good shape, only because I figured out the source of the seize last night while taking it all apart. The left radiator had a gaping crack in it (also going to be welded), so I'm assuming the previous owner dinged that, kept riding with out coolant, and heat seized the piston. If the bottom end is shot I do plan on rebuilding it, but it will have to wait for money income to build up a little  :-X  It seems as though the bottom end is alright, but something funky is going on. Probably will be splitting the cases.
« Last Edit: December 31, 1969, 04:00:00 PM by ' »

Offline Coop

  • Global Moderator
  • Professional
  • *****
  • Posts: 2183
    • View Profile
My next project
« Reply #11 on: April 11, 2013, 08:27:17 PM »
Is there any play at the flywheel? Any at all and the crank bearings are bad.

Is there any up/down play in the rod? Any at all and the rod bearings are bad. Some side to side is normal.
« Last Edit: December 31, 1969, 04:00:00 PM by ' »
- Mike - Don't take life so seriously, nobody gets out alive.

Offline cnrcpla

  • Novice
  • *
  • Posts: 0
    • View Profile
My next project
« Reply #12 on: April 11, 2013, 08:37:02 PM »
No movement in the crank bearings, the wrist pin needle bearing was shot though. I think there is some debris in the bottom end, as it moves freely, then stops, then wont move back. I am surprised that the cyl is still in good shape, perfectly smooth except for one small groove then I will be honing out.
« Last Edit: December 31, 1969, 04:00:00 PM by ' »

Offline cnrcpla

  • Novice
  • *
  • Posts: 0
    • View Profile
My next project
« Reply #13 on: April 11, 2013, 09:47:05 PM »
Well the big end bearing seems to have grenaded in the bottom end. That would explain the odd movement. The main bearings seem alright, no movement, but I'm not saying anything for sure until I split the cases and see for sure. Now, on to my next question. I get the whole case splitting cases concept (this will be my frist one), but how do I check the timing after I remove the flywheel upon reassembly?

Anyways, the swing arm pivot axle is frozen to the engine... shocker  :<img src=" title="Roll Eyes" class="smiley">  Whats the best method to removing this? Heat and a press?

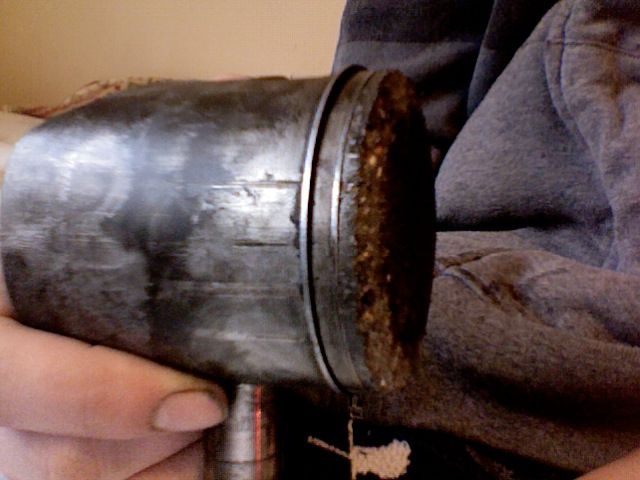
Also, here's a pic of the cooked piston:


Expect more questions as I get into the cases, just a heads up  ;D
« Last Edit: December 31, 1969, 04:00:00 PM by ' »

Offline TMKIWI

  • Professional
  • *****
  • Posts: 1634
    • View Profile
My next project
« Reply #14 on: April 12, 2013, 01:30:15 AM »
The stator plate has a groove in it that lines up with a casting mark.
Scribe a line on the plate to mark where it is at now.
Just line the mark up when you put it back together.
« Last Edit: December 31, 1969, 04:00:00 PM by ' »
If you don't fall off you are not going hard enough