Coming Soon
Home > Forum


Author Topic: RM250 Rebuild  (Read 16909 times)

0 Members and 1 Guest are viewing this topic.

Offline TMKIWI

  • Professional
  • *****
  • Posts: 1634
    • View Profile
RM250 Rebuild
« Reply #45 on: May 24, 2013, 05:22:33 AM »
My clutch basket was toast and I couldn't find any aftermarket one's and OEM was too dear.
I found on trademe a cheap Dr400 basket, So i did some reshearch and found that DR400's used the same plates and hub.
I took a punt and when it arrived it matched up except the drive gear was different.
So I drilled out the rivets and swaped over the backing plate.
I now have a mint basket for less then $50.


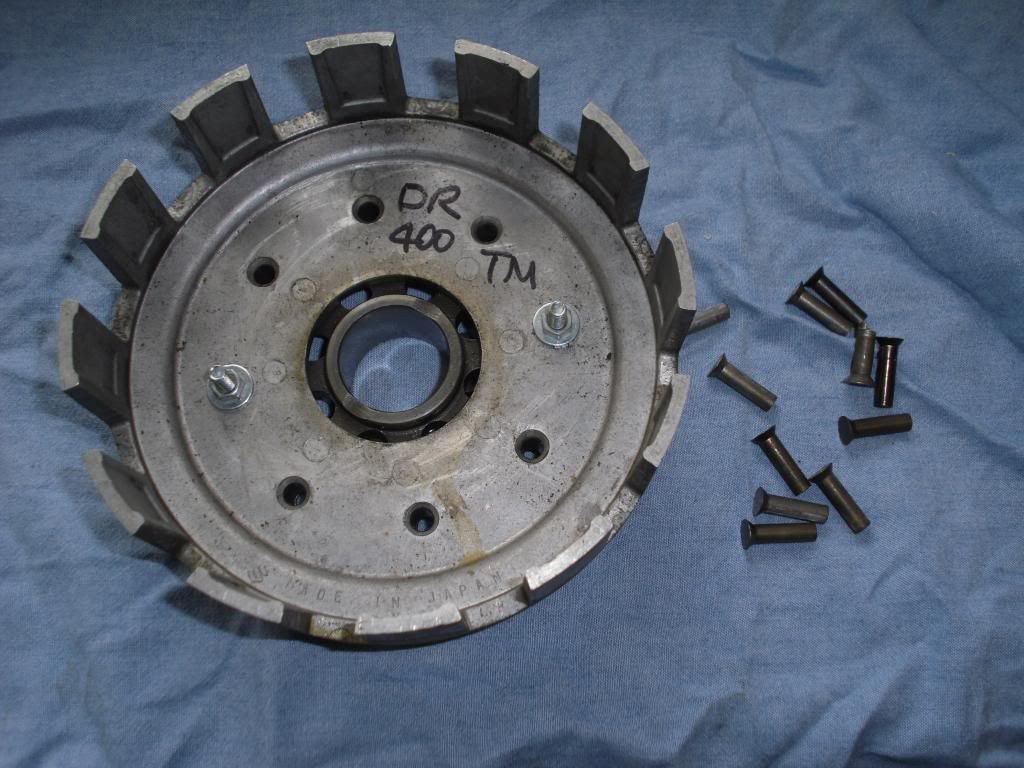
I will press in the new rivets tommorrow.

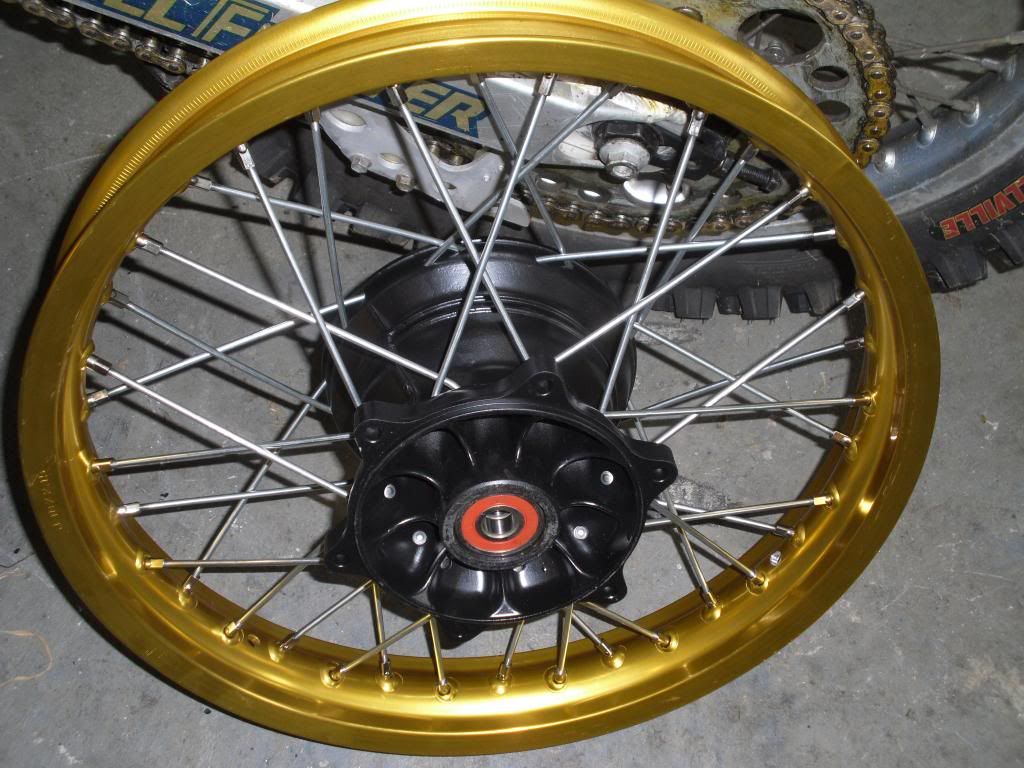
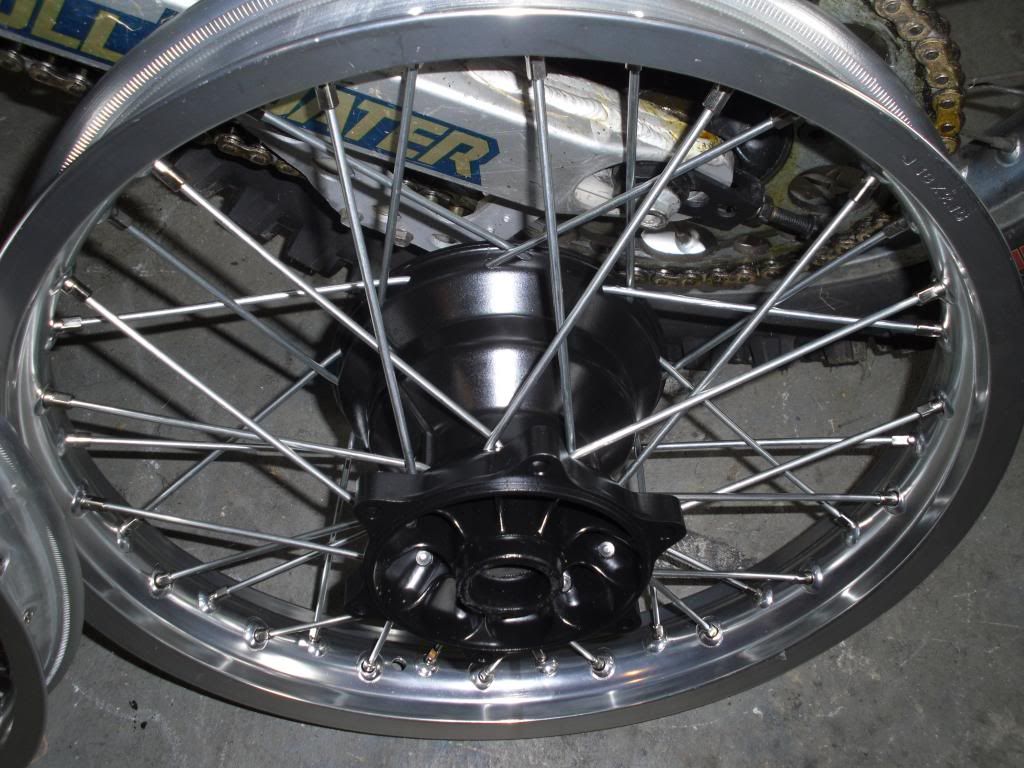
My spokes arrived yesterday and I laced them up this morning.
Painted hubs ( Satin Black ) with new bearings, Stainless spokes & new rims.
I was dreading the job but it turned out pretty easy.
Took a couple of hours to do all 4.


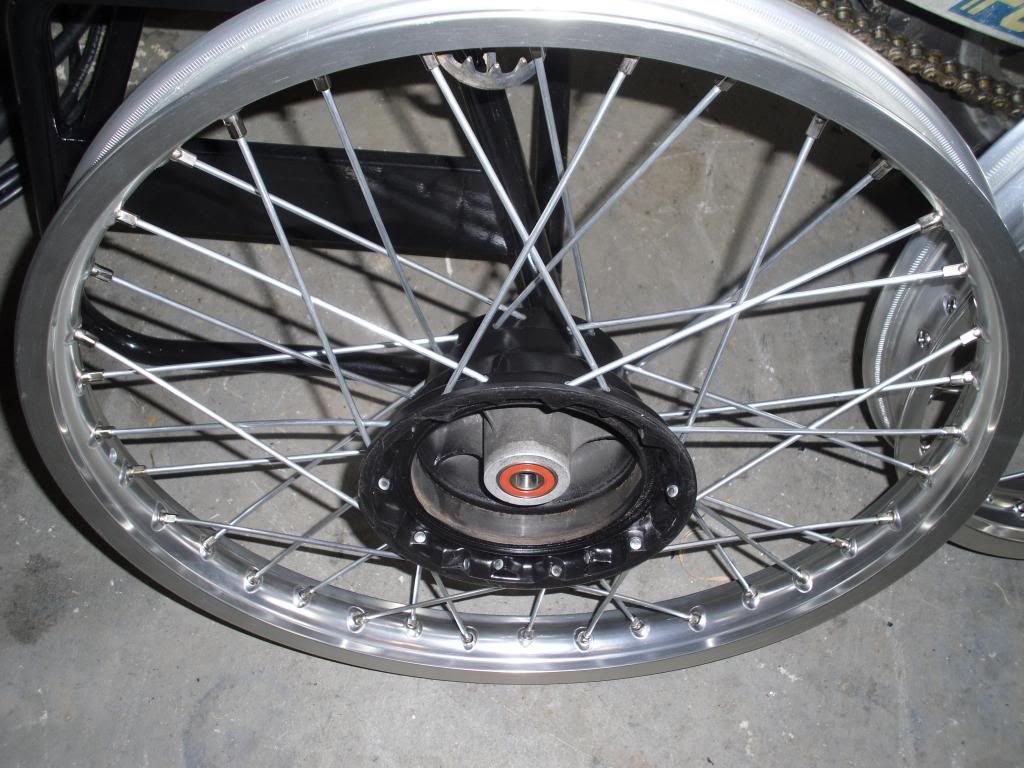
Trued up 2 of the rims this afternoon. Again not that hard if you have some paitence.


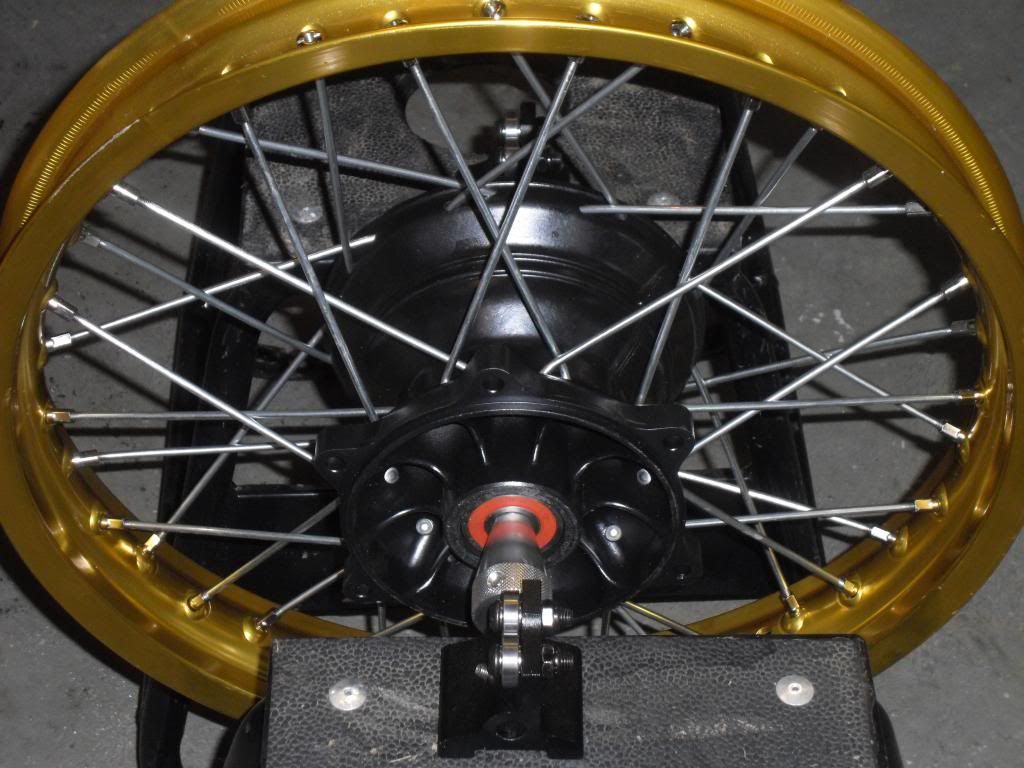
I need to swap out the front end on the 125 and put on the drum front end. The silver wheels are for the 125, the gold, 250.
The crank has been assembled with the new rod so might put the bottom end together tomorrow or do the front end. :-
All got to be done at some time.
Need to order a sproket for the 250 as well.
« Last Edit: December 31, 1969, 04:00:00 PM by ' »
If you don't fall off you are not going hard enough

Offline TMKIWI

  • Professional
  • *****
  • Posts: 1634
    • View Profile
RM250 Rebuild
« Reply #46 on: May 25, 2013, 05:38:41 AM »
Painted the cases today ready for assembly.


08' YZ footpegs grafted onto the RM pivots.

« Last Edit: December 31, 1969, 04:00:00 PM by ' »
If you don't fall off you are not going hard enough

Offline dogger315

  • Expert
  • ****
  • Posts: 113
    • View Profile
RM250 Rebuild
« Reply #47 on: June 01, 2013, 05:45:47 PM »
Wow! This is a really nice build!

Some nice improvising on the pegs and clutch basket.

The wheels and frame turned out great, can't wait to see
the next installment.

dogger
« Last Edit: December 31, 1969, 04:00:00 PM by ' »

Offline TMKIWI

  • Professional
  • *****
  • Posts: 1634
    • View Profile
RM250 Rebuild
« Reply #48 on: June 01, 2013, 09:37:10 PM »
Thanks dogger.
Means alot coming from you. ;D
« Last Edit: December 31, 1969, 04:00:00 PM by ' »
If you don't fall off you are not going hard enough

Offline TMKIWI

  • Professional
  • *****
  • Posts: 1634
    • View Profile
RM250 Rebuild
« Reply #49 on: June 02, 2013, 04:16:06 AM »
Put the bottom end together today. Was going to set up the barrel and head ( port height/squish etc ) but run out of time. Another day.
Pics.


« Last Edit: December 31, 1969, 04:00:00 PM by ' »
If you don't fall off you are not going hard enough

Offline SachsGS

  • Professional
  • *****
  • Posts: 1235
    • View Profile
RM250 Rebuild
« Reply #50 on: June 02, 2013, 02:23:43 PM »
Looking good! Any idea what this resto is costing you?
« Last Edit: December 31, 1969, 04:00:00 PM by ' »

Offline TMKIWI

  • Professional
  • *****
  • Posts: 1634
    • View Profile
RM250 Rebuild
« Reply #51 on: June 03, 2013, 07:38:27 AM »
I don't tend to worry about the costs that much.
But probably about 3k.
1k on motor
1k on frame
1k on suspension.
One day I may add up all the reciepts. Maybe.
« Last Edit: December 31, 1969, 04:00:00 PM by ' »
If you don't fall off you are not going hard enough

Offline TMKIWI

  • Professional
  • *****
  • Posts: 1634
    • View Profile
RM250 Rebuild
« Reply #52 on: June 15, 2013, 08:25:10 AM »
Fitted new clutch plates.


Fitted the tyres to the rims today as well.
BTW, The new MS3 tyres have very stiff side walls. ><img src=" title="Angry" class="smiley"> I hate fitting tyres.
« Last Edit: December 31, 1969, 04:00:00 PM by ' »
If you don't fall off you are not going hard enough

Offline citabjockey

  • Expert
  • ****
  • Posts: 145
    • View Profile
    • Yamaha Vintage Enduros
RM250 Rebuild
« Reply #53 on: June 15, 2013, 02:15:37 PM »
Great work TMK! Watching with keen interest!
« Last Edit: December 31, 1969, 04:00:00 PM by ' »
Yamaha CT3, RT3, MX125, SC500, Toy Prius, Diesel F250 (it all balances out)

Offline Coop

  • Global Moderator
  • Professional
  • *****
  • Posts: 2183
    • View Profile
RM250 Rebuild
« Reply #54 on: June 15, 2013, 07:45:56 PM »
Very nice!
« Last Edit: December 31, 1969, 04:00:00 PM by ' »
- Mike - Don't take life so seriously, nobody gets out alive.

Offline TMKIWI

  • Professional
  • *****
  • Posts: 1634
    • View Profile
RM250 Rebuild
« Reply #55 on: June 27, 2013, 11:00:21 AM »
Finally got the cylinder & head sorted.
I have droped the cylinder 0.5mm and am going to dispense with the head gasket and use o-rings instead.
I machined the head to give me 1mm squish but without the 1.6mm thickness of the headgasket the compression ratio was too high. So I cc'ed the head and then machined the combustion chamber to give me 50% squish and the correct compression .
Lots of measureing but all ready to go together tommorrow.

Cylinder machined with o-ring grooves to replace the head gasket.


Head machined to compensate for lack of head gasket and squish band machined to 50%

[/UR

« Last Edit: December 31, 1969, 04:00:00 PM by ' »
If you don't fall off you are not going hard enough

Offline TMKIWI

  • Professional
  • *****
  • Posts: 1634
    • View Profile
RM250 Rebuild
« Reply #56 on: June 28, 2013, 07:22:10 AM »
Motor finished.

« Last Edit: December 31, 1969, 04:00:00 PM by ' »
If you don't fall off you are not going hard enough

Offline _X_

  • Professional
  • *****
  • Posts: 272
  • M.I.R.A.
    • View Profile
RM250 Rebuild
« Reply #57 on: June 29, 2013, 03:34:16 PM »
i cant help but associate the motor to darth vader for some reason.
« Last Edit: December 31, 1969, 04:00:00 PM by ' »

Offline TMKIWI

  • Professional
  • *****
  • Posts: 1634
    • View Profile
RM250 Rebuild
« Reply #58 on: June 30, 2013, 08:49:34 AM »
i cant help but associate the motor to darth vader for some reason.

I hope it's not, that evil. ;)
« Last Edit: December 31, 1969, 04:00:00 PM by ' »
If you don't fall off you are not going hard enough

Offline TMKIWI

  • Professional
  • *****
  • Posts: 1634
    • View Profile
RM250 Rebuild
« Reply #59 on: July 05, 2013, 05:21:05 AM »
Got the front end on today. Before I could fit it I had to press out the steering stem from the lower tripple clamp and machine the top bearing seat as the All Balls kit comes with a taper roller top bearing where as the original has the old 3 piece bearing.  The All Balls kit won't fit without this mod. Once I had done that and pressed the stem back in , it all went together well.
Put the radiators on and drilled the new plastics to suit. Fitted the CDI and coil ready for testing tommorrow. Fitted front wheel, guard , front board and bars.
Will fit motor in tommorrow and fit the 125 stator and see if I have spark.
Need to fit up exhaust and make some mounting plates and lots of other small things.


« Last Edit: December 31, 1969, 04:00:00 PM by ' »
If you don't fall off you are not going hard enough