Coming Soon
Home > Forum


Author Topic: RM250 Rebuild  (Read 16878 times)

0 Members and 1 Guest are viewing this topic.

Offline TMKIWI

  • Professional
  • *****
  • Posts: 1634
    • View Profile
RM250 Rebuild
« Reply #30 on: March 11, 2013, 10:36:28 AM »
Gudgeon pin 18mm. :-[
Flat plate volume 25cc
head gasket 6cc
Positive deck height 0.5mm
Dome 11.7cc
Centre of piston pin to timing edge 33mm.
Intake port heights. 52mm. 4 closest to intake
Transfer 50.5mm. 2 ports closest to exhaust.
Cheers
« Last Edit: December 31, 1969, 04:00:00 PM by ' »
If you don't fall off you are not going hard enough

Offline 2T Institute

  • Expert
  • ****
  • Posts: 225
    • View Profile
RM250 Rebuild
« Reply #31 on: March 11, 2013, 11:55:17 AM »
Be nice if you could find a 2mm oversive Husqvarna/Cagiva WMX 250 piston 90-91 That would make the long rod simple (has a 17mm comp height so you would only need a thick base gasket.


If no you can drop the cyl 0.5mm and remachine the head. Need to get the cylinder down as much as possible, 1mm of timing edge exposed is OK. Full reed makes inlet timing irrelevant. Rest looks OK. Post some pics and I'll give you some pointers.

« Last Edit: December 31, 1969, 04:00:00 PM by ' »

Offline TMKIWI

  • Professional
  • *****
  • Posts: 1634
    • View Profile
RM250 Rebuild
« Reply #32 on: March 12, 2013, 04:56:08 AM »


« Last Edit: December 31, 1969, 04:00:00 PM by ' »
If you don't fall off you are not going hard enough

Offline 2T Institute

  • Expert
  • ****
  • Posts: 225
    • View Profile
RM250 Rebuild
« Reply #33 on: March 12, 2013, 09:54:35 AM »
Gunna need a fair bit of liquid steel on those ducts. I can't upload directly PM me your email. Machine the head so there is 0.00mm rad on the squish curtain(inside edge) to start with.
« Last Edit: December 31, 1969, 04:00:00 PM by ' »

Offline TMKIWI

  • Professional
  • *****
  • Posts: 1634
    • View Profile
RM250 Rebuild
« Reply #34 on: March 27, 2013, 07:06:48 AM »
Got the graphics fitted to the new plastics.


New exhaust system.


New carby.

« Last Edit: December 31, 1969, 04:00:00 PM by ' »
If you don't fall off you are not going hard enough

Offline factoryX

  • Professional
  • *****
  • Posts: 855
  • Hurry! Follow the other farting sheep!
    • View Profile
RM250 Rebuild
« Reply #35 on: March 27, 2013, 11:12:50 PM »
Nice!
« Last Edit: December 31, 1969, 04:00:00 PM by ' »


I ride an 03 yz250, wait 04, wait 05, what ever, they're all the same #$@% YOU!

Offline _X_

  • Professional
  • *****
  • Posts: 272
  • M.I.R.A.
    • View Profile
RM250 Rebuild
« Reply #36 on: March 28, 2013, 12:04:06 AM »
see, guru.
« Last Edit: December 31, 1969, 04:00:00 PM by ' »

Offline Coop

  • Global Moderator
  • Professional
  • *****
  • Posts: 2183
    • View Profile
RM250 Rebuild
« Reply #37 on: April 03, 2013, 01:36:33 PM »
Very nice, looking forward to seeing it done!
« Last Edit: December 31, 1969, 04:00:00 PM by ' »
- Mike - Don't take life so seriously, nobody gets out alive.

Offline TMKIWI

  • Professional
  • *****
  • Posts: 1634
    • View Profile
RM250 Rebuild
« Reply #38 on: April 24, 2013, 06:12:29 AM »
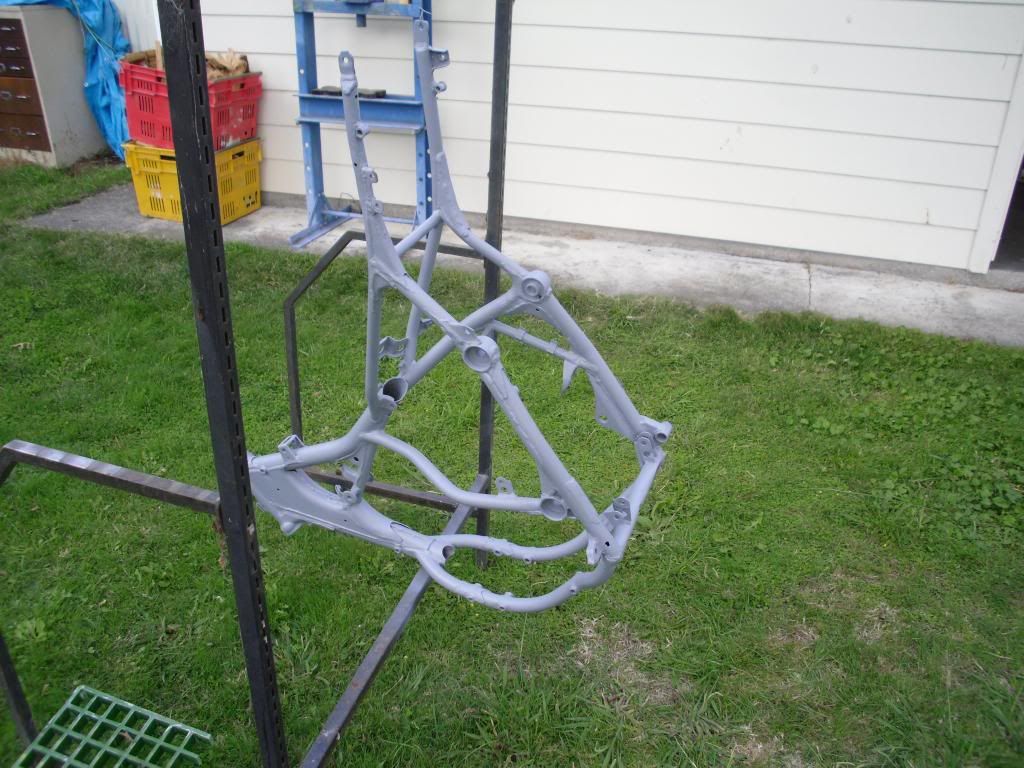
Frame has been rebuilt with new lower rails fitted.
I was planning on painting it today so I primed it.


I grabbed my spray gun and put some thinners in it to give it a clean when all the thinners just ran out of the bottom of the bowl. :o
The bloody thing has a big crack in the bottom of the bowl. ><img src=" title="Angry" class="smiley"> Will try and buy a new bowl tommorrow.
So I decided to do something else and pulled out of their box the drum brake fork set which will go on the 125.
They were already striped so set about cleaning them and fitting the new Race Tech springs and gold valves.


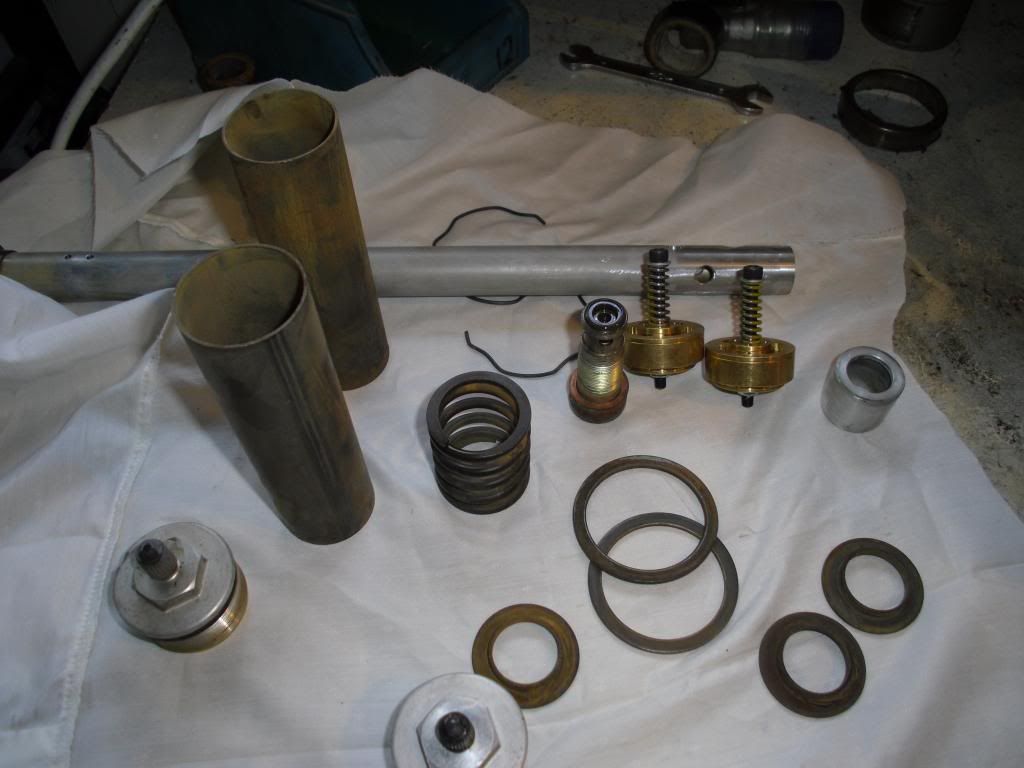
I drilled out and added more compression holes in the damping rod ( these don't do anything now ) , you can see in the photo behind the gold valves.
I checked the preload on the gold valve springs and adjusted to where race tech recomends.
I reinstalled everything into the fork leg and measured the preload and will make up some new spacer tubes at work. Have ordered some new seals and will have them ready this week.

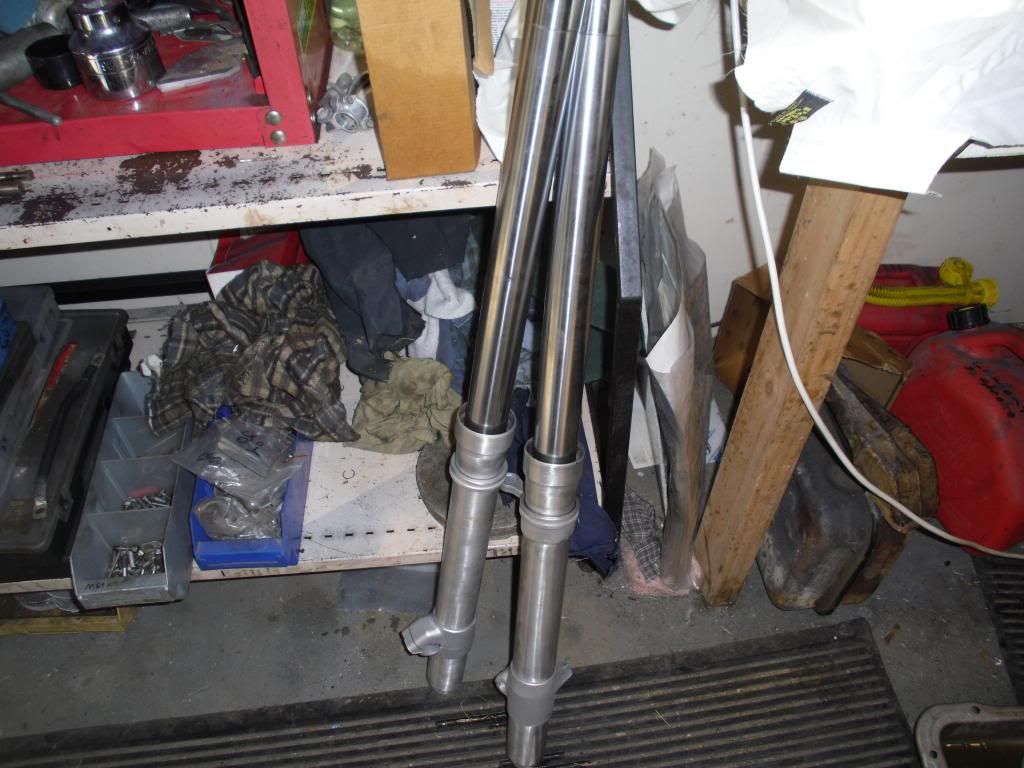
Forks waiting for seals.


Still waiting on the conrod to arrive so I can start on the motor.
« Last Edit: December 31, 1969, 04:00:00 PM by ' »
If you don't fall off you are not going hard enough

Offline _X_

  • Professional
  • *****
  • Posts: 272
  • M.I.R.A.
    • View Profile
RM250 Rebuild
« Reply #39 on: April 27, 2013, 01:49:14 AM »
you have to love the conventional forks ease of maintenance.
« Last Edit: December 31, 1969, 04:00:00 PM by ' »

Offline TMKIWI

  • Professional
  • *****
  • Posts: 1634
    • View Profile
RM250 Rebuild
« Reply #40 on: April 27, 2013, 05:55:51 AM »
Got the frame painted today.

« Last Edit: December 31, 1969, 04:00:00 PM by ' »
If you don't fall off you are not going hard enough

Offline TMKIWI

  • Professional
  • *****
  • Posts: 1634
    • View Profile
RM250 Rebuild
« Reply #41 on: May 11, 2013, 12:44:01 AM »
Have striped the wheels ready for new rims and spokes.
Bead balsted hubs.


Will paint them black as standard. I think. :-

New rims.


Spokes are being sent away this week to get custom made replacments.
Have purchased a jig to respoke them. Should be fun. Never done it before.
Still waiting on conrod which I ordered 6 weeks ago. Hopefully this week.
« Last Edit: December 31, 1969, 04:00:00 PM by ' »
If you don't fall off you are not going hard enough

Offline 2T Institute

  • Expert
  • ****
  • Posts: 225
    • View Profile
RM250 Rebuild
« Reply #42 on: May 11, 2013, 03:51:23 AM »
Did you measure the off set before you pulled them apart?

Here's the best jig I have seen, all made from scrap material


« Last Edit: December 31, 1969, 04:00:00 PM by ' »

Offline TMKIWI

  • Professional
  • *****
  • Posts: 1634
    • View Profile
RM250 Rebuild
« Reply #43 on: May 11, 2013, 05:55:48 AM »
Yep I did. I like that jig.
I should have said an alignment tool, not jig. It was cheaper to buy then I could have made with my time.
Might have to knock one up. Jig that is.
« Last Edit: December 31, 1969, 04:00:00 PM by ' »
If you don't fall off you are not going hard enough

Offline 2T Institute

  • Expert
  • ****
  • Posts: 225
    • View Profile
RM250 Rebuild
« Reply #44 on: May 12, 2013, 05:37:28 AM »
The brilliance of Dave Fenners jig (he's a master machinist and writes for Model Engineers Workshop where the article comes from) is it does axial and radial alignment as well as off set in one go. 
« Last Edit: December 31, 1969, 04:00:00 PM by ' »